Simulating ECUs and Security Functions#
HydraVision - Automated Testing with HydraVision from Dissecto.
Why Simulate ECUs?#
HydraVision, our flagship tool for automating the security testing of ECUs, is loaded with over 100 ready-to-use security tests, and that number keeps growing. Our test case library lets you run out-of-the-box security tests on your ECUs, but let’s be real—security testing is tough, and creating reliable tests for generic ECUs is even tougher. That’s why deep, automated, and continuous testing of our test case library is a must to deliver top-notch security test cases.
At Dissecto, we use a two-stage process to keep our test case libraries in peak condition. First, we develop new test cases on a variety of real-world ECUs. This ensures we catch most corner cases because, let’s face it, the devil’s in the details. No two ECUs behave exactly the same at the protocol level. They might speak the same language, but the nuances—different return codes, timing, delays, you name it—always vary.
This is where our simulated ECUs and security functions come into play for test case verification.
And here’s the kicker—we’re using Scapy’s automatons to make this happen. That means you can easily tweak our setup to simulate your own ECUs. So, gear up and ensure your security tests are as hardcore as your hacking skills.
Scapy’s Automatons#
Scapy makes it a breeze to create network automatons without sticking to a rigid model like Moore or Mealy automata. Instead, it offers the flexibility to craft your own approach.
A Scapy automaton is deterministic, operating with different states, including a start state, end states, and error states. Transitions between these states can occur based on specific conditions, the reception of certain packets, or timeouts. When a transition happens, one or more actions can be triggered. These actions can be linked to multiple transitions, and parameters can be passed between states, transitions, and actions.
For more details, check out the Scapy documentation.
Practical Part#
Modeling an ECU as an Automaton#
To get started, we need to power cycle our simulated ECU. We’ll create a simple automaton with two states: ON and OFF. But before we dive into building the actual ECU automaton, we need a power supply interface.
Power Supply#
The power supply object serves as the interface to power cycle our ECU automaton. We need a way for the automaton to communicate with the power supply and vice versa, to simulate the ECU’s power consumption accurately. To support multiprocessing, we’ll use file descriptors and multiprocessing Values. Here’s how you can set it up:
import logging
import sys

from multiprocessing import Value, Pipe
from multiprocessing.sharedctypes import Synchronized

logging.basicConfig(stream=sys.stdout, level=logging.DEBUG)


class AutomatonPowerSupply():

    def __init__(self) -> None:
        super().__init__()
        self.logger = logging.getLogger("AutomatonPowerSupply")
        self.logger.info("Init done")
        self.voltage_on: Synchronized[int] = Value("i", 0)
        self.current_noise: Synchronized[int] = Value("i", 0)
        self.current_on: Synchronized[int] = Value("i", 0)
        self.delay_off = 0.001
        self.delay_on = 0.001
        self.read_pipe, self.write_pipe = Pipe()
        self.closed = False

    def on(self) -> None:
        self.logger.debug("ON")
        with self.voltage_on.get_lock():
            self.voltage_on.value = 12
        self.write_pipe.send(b"1")

    def off(self) -> None:
        self.logger.debug("OFF")
        with self.voltage_on.get_lock():
            self.voltage_on.value = 0
        self.write_pipe.send(b"0")

    def close(self) -> None:
        if self.closed:
            return
        self.closed = True
        self.read_pipe.close()
        self.write_pipe.close()

    def reset(self) -> None:
        self.off()
        time.sleep(self.delay_off)
        self.on()
        time.sleep(self.delay_on)
This code sets up the power supply, allowing it to control the power state of the ECU automaton. The on, off, and reset methods handle state transitions, while Pipe and Value facilitate inter-process communication and synchronization. This setup ensures that the ECU’s power consumption can be accurately modeled and controlled within a multiprocessing environment.
ECU Automaton#
Now that we have a power supply, we can start modeling our ECU automaton, which can be turned on and off.
from typing import Optional, List, IO, Type, Any

from scapy.automaton import Automaton, ATMT


class EcuAutomaton(Automaton):
    def __init__(self, *args: Any, power_supply: AutomatonPowerSupply, **kargs: Any) -> None:
        self.power_supply = power_supply
        super().__init__(*args,
                         external_fd={"power_supply_fd": self.power_supply.read_pipe.fileno()},
                         **kargs)

    @ATMT.state(initial=1)  # type: ignore
    def ECU_OFF(self) -> None:
        pass

    @ATMT.state()  # type: ignore
    def ECU_ON(self) -> None:
        pass

    # ====== POWER HANDLING ==========
    @ATMT.ioevent(ECU_OFF, name="power_supply_fd")  # type: ignore
    def event_voltage_changed_on(self, fd: IO[bytes]) -> None:
        new_voltage = fd.read(1)
        if new_voltage == b"1":
            raise self.ECU_ON()

    @ATMT.ioevent(ECU_ON, name="power_supply_fd")  # type: ignore
    def event_voltage_changed_off(self, fd: IO[bytes]) -> None:
        new_voltage = fd.read(1)
        if new_voltage == b"0":
            raise self.ECU_OFF()

    @ATMT.action(event_voltage_changed_on)  # type: ignore
    def action_consumption_on(self) -> None:
        self.debug(1, "Consuming energy ON")
        with self.power_supply.current_on.get_lock():
            self.power_supply.current_on.value = 1

    @ATMT.action(event_voltage_changed_off)  # type: ignore
    def action_consumption_off(self) -> None:
        self.debug(1, "Consuming energy OFF")
        with self.power_supply.current_on.get_lock():
            self.power_supply.current_on.value = 0
This code defines an EcuAutomaton class that models an ECU with two states: ON and OFF. It uses Scapy’s automaton framework to handle the state transitions based on the power supply’s status. The event_voltage_changed_on and event_voltage_changed_off methods listen for voltage changes to switch states, while action_consumption_on and action_consumption_off manage the power consumption behavior. This setup allows for a robust simulation of an ECU’s power cycling behavior.
#EcuAutomaton.graph(format="png", target="images/SimpleEcu.png")
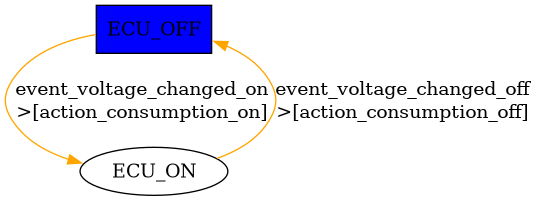
Fig. 71 Minimalistic ECU state diagram, showing the two states, ON and OFF, its transitions, and the actions on the transitions.#
Let’s give it a shot:
import threading
import time

from scapy.contrib.cansocket import NativeCANSocket
from scapy.error import log_runtime

ps = AutomatonPowerSupply()
cs = NativeCANSocket("vcan0")
automaton = EcuAutomaton(debug=1, power_supply=ps, sock=cs)
automaton.runbg()

ps.on()
time.sleep(0.1)
print(f"Current consumption {ps.current_on.value}")
ps.off()
time.sleep(0.1)
print(f"Current consumption {ps.current_on.value}")

automaton.stop()
INFO:AutomatonPowerSupply:Init done
---------------------------------------------------------------------------
OSError                                   Traceback (most recent call last)
Cell In[4], line 8
      5 from scapy.error import log_runtime
      7 ps = AutomatonPowerSupply()
----> 8 cs = NativeCANSocket("vcan0")
      9 automaton = EcuAutomaton(debug=1, power_supply=ps, sock=cs)
     10 automaton.runbg()

File /usr/local/lib/python3.13/site-packages/scapy/contrib/cansocket_native.py:128, in NativeCANSocket.__init__(self, channel, receive_own_messages, can_filters, fd, basecls, **kwargs)
    122     filter_data.append(can_filter["can_mask"])
    124 self.ins.setsockopt(socket.SOL_CAN_RAW,
    125                     socket.CAN_RAW_FILTER,
    126                     struct.pack(can_filter_fmt, *filter_data))
--> 128 self.ins.bind((self.channel,))
    129 self.outs = self.ins

OSError: [Errno 19] No such device
This code sets up and tests our ECU automaton. We import the necessary modules and initialize the power supply and CAN socket. We then create an instance of EcuAutomaton with debugging enabled, and run it in the background.
We power on the ECU and wait a bit to let it stabilize. Then, we print the current consumption, turn off the power, wait again, and print the current consumption once more. Finally, we stop the automaton.
By running this code, you should see the current consumption values change as the ECU powers on and off, demonstrating our automaton in action. Happy hacking!
Simulating UDS#
Next up, we want to communicate with our automaton over UDS (Unified Diagnostic Services), aiming to implement complex state machines like Security Access. Let’s start with a simpler example. The following function allows us to receive and send packets from the automaton’s socket, as provided in the init function.
class EcuAutomaton(Automaton):

    # Existing states and transitions

    @ATMT.receive_condition(ECU_ON)  # type: ignore
    def on_pkt_on_received_ON(self, pkt: Packet) -> None:
        response = None
        if pkt:
            if response := self.get_default_uds_response(pkt):
                self.my_send(response)

    def get_default_uds_response(self, pkt: Packet) -> Optional[Packet]:
        service = bytes(pkt)[0]
        length = len(pkt)
        sub_function = bytes(pkt)[1] if length > 1 else None
        match service, length, sub_function:
            case 0x10, 2, 1:
                return UDS() / UDS_DSCPR(b"\x01")
            case 0x3E, 2, 0:
                return UDS() / UDS_TPPR()
            case 0x3E, 2, 0x80:
                return None
            case 0x3E, 2, _:
                return UDS() / UDS_NR(requestServiceId=service,
                                      negativeResponseCode="subFunctionNotSupported")
            case 0x3E, _, _:
                return UDS() / UDS_NR(requestServiceId=service,
                                      negativeResponseCode="incorrectMessageLengthOrInvalidFormat")
            case 0x27, _, _:
                return UDS() / UDS_NR(requestServiceId=service,
                                      negativeResponseCode="incorrectMessageLengthOrInvalidFormat")
            case _:
                return UDS() / UDS_NR(requestServiceId=service, negativeResponseCode="serviceNotSupported")
By using Python’s match-case operator, we can craft a very elegant UDS answering machine. ECUs are usually precise with their negative response codes, and modeling this becomes straightforward with the match operator.
For instance, consider the TesterPresent case. If we receive the correct service, length, and sub-function, we respond positively. If the sub-function is anything else, we fall through to the negative response case “subFunctionNotSupported”. If the length is incorrect, we return “incorrectMessageLengthOrInvalidFormat”. Finally, if the service is unknown, the function returns “serviceNotSupported”.
This approach allows us to handle UDS communication effectively and implement the necessary logic for our ECU automaton.
Full example:
from typing import Optional, List, IO, Type, Any

from scapy.packet import Packet
from scapy.automaton import ATMT, Automaton
from scapy.contrib.automotive.uds import *
from scapy.contrib.isotp import *


class EcuAutomaton(Automaton):
    def __init__(self, *args: Any, power_supply: AutomatonPowerSupply, **kargs: Any) -> None:
        self.power_supply = power_supply
        super().__init__(*args,
                         external_fd={"power_supply_fd": self.power_supply.read_pipe.fileno()},
                         **kargs)

    @ATMT.state(initial=1)  # type: ignore
    def ECU_OFF(self) -> None:
        pass

    @ATMT.state()  # type: ignore
    def ECU_ON(self) -> None:
        pass

    # ====== POWER HANDLING ==========
    @ATMT.ioevent(ECU_OFF, name="power_supply_fd")  # type: ignore
    def event_voltage_changed_on(self, fd: IO[bytes]) -> None:
        new_voltage = fd.read(1)
        if new_voltage == b"1":
            raise self.ECU_ON()

    @ATMT.ioevent(ECU_ON, name="power_supply_fd")  # type: ignore
    def event_voltage_changed_off(self, fd: IO[bytes]) -> None:
        new_voltage = fd.read(1)
        if new_voltage == b"0":
            raise self.ECU_OFF()

    @ATMT.action(event_voltage_changed_on)  # type: ignore
    def action_consumption_on(self) -> None:
        self.debug(1, "Consuming energy ON")
        with self.power_supply.current_on.get_lock():
            self.power_supply.current_on.value = 1

    @ATMT.action(event_voltage_changed_off)  # type: ignore
    def action_consumption_off(self) -> None:
        self.debug(1, "Consuming energy OFF")
        with self.power_supply.current_on.get_lock():
            self.power_supply.current_on.value = 0

    @ATMT.receive_condition(ECU_ON)  # type: ignore
    def on_pkt_on_received(self, pkt: Packet) -> None:
        if response := self.get_default_uds_response(pkt):
            self.my_send(response)

    def get_default_uds_response(self, pkt: Packet) -> Optional[Packet]:
        service = bytes(pkt)[0]
        length = len(pkt)
        sub_function = bytes(pkt)[1] if length else None
        match service, length, sub_function:
            case 0x10, 2, 1:
                return UDS()/UDS_DSCPR(b"\x01")
            case 0x3E, 2, 0:
                return UDS() / UDS_TPPR()
            case 0x3E, 2, 0x80:
                return None
            case 0x3E, 2, _:
                return UDS() / UDS_NR(requestServiceId=service,
                                      negativeResponseCode="subFunctionNotSupported")
            case 0x3E, _, _:
                return UDS() / UDS_NR(requestServiceId=service,
                                      negativeResponseCode="incorrectMessageLengthOrInvalidFormat")
            case 0x27, _, _:
                return UDS() / UDS_NR(requestServiceId=service,
                                      negativeResponseCode="incorrectMessageLengthOrInvalidFormat")
            case _:
                return UDS() / UDS_NR(requestServiceId=service, negativeResponseCode="serviceNotSupported")
Demo-Time#
import time

ps = AutomatonPowerSupply()
s1 = ISOTPNativeSocket("vcan0", rx_id=123, tx_id=321, basecls=UDS)
s2 = ISOTPNativeSocket("vcan0", tx_id=123, rx_id=321, basecls=UDS)
automaton = EcuAutomaton(debug=1, power_supply=ps, sock=s1)
automaton.runbg()

ps.on()
time.sleep(0.1)
print(f"Current consumption {ps.current_on.value}")
rx = s2.sr1(UDS()/UDS_TP(), verbose=False, timeout=0.1)
print(repr(rx))

ps.off()
time.sleep(0.2)
print(f"Current consumption {ps.current_on.value}")
rx = s2.sr1(UDS()/UDS_TP(), verbose=False, timeout=0.1)
print(repr(rx))

automaton.stop()
INFO:AutomatonPowerSupply:Init done
DEBUG:AutomatonPowerSupply:ON
DEBUG: ## state=[ECU_OFF]
DEBUG: Consuming energy ON
DEBUG: ## state=[ECU_ON]
Current consumption 1
RX  <UDS  service=TesterPresent |<UDS_TP  subFunction=0 |>>
<UDS  service=TesterPresentPositiveResponse |<UDS_TPPR  zeroSubFunction=0 |>>
DEBUG:AutomatonPowerSupply:OFF
DEBUG: Consuming energy OFF
DEBUG: ## state=[ECU_OFF]
Current consumption 0
None
Now our automaton responds to UDS packets when it’s ON.
This demo sets up the power supply and UDS sockets, then runs the EcuAutomaton in the background. We power on the ECU, wait a bit, and send a UDS packet to it, printing the response. We then turn off the ECU, wait a bit longer, and send another UDS packet, printing the response again. This shows how our automaton handles UDS communication based on its power state.